If, Else
In this tutorial, you can learn how to use a photoresistor as a sensor of light. There’s two leds. The other lits when it’s light, the other when it’s dark.
1. Install and wire two leds into your breadboard, as you installed on previous task. Use digital pins 11 and 13.
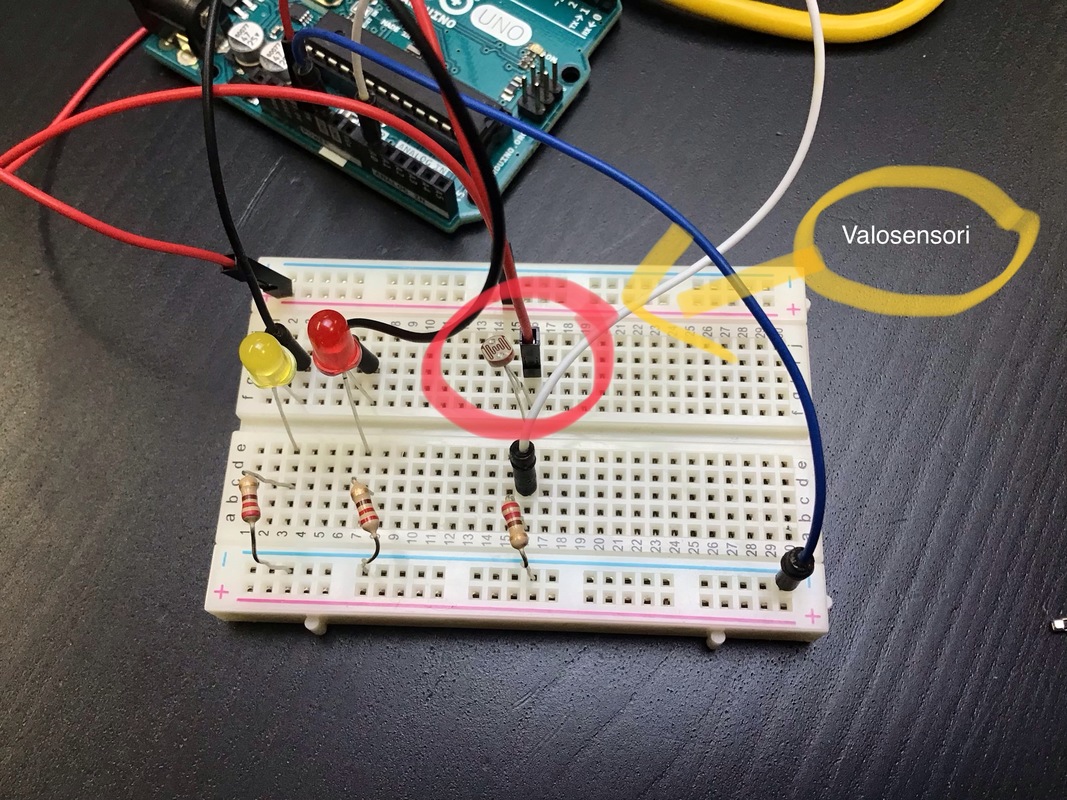
2. Here’s how to install a photoresistor:


- Above, I have made settings where digital pin 11 goes ”off” and pin 13 goes ”on” and the others are opposite. Those are inside a Control ”If Else” -block. There is a ”forewer” block waiting. Notice blocks colours. All control blocks are yellow.

- The program has to loop forever, because the photoresistor have to observe the amount of light all the time. So put you program inside ”Forever”

- I want to make it like this: If there is not enough light, turn pin 11 off and punt pin 13 on. Else turn on pin 11 and pin 13 off.
- The photoresistor is an analogic sensor. It gives values of the amount of light in numbers between 0-1023. The bigger number, more light.
- So, I’ll use the green ”smaller than” -block. I dropped it inside ”If”. But I’ll have to find out what numbers to put in. What is the amount of light now?

- Choose Arduino -blocks and pick ”Analog reading”. Now choose from dropdown menu the pin that you connected to Arduino. Now, click the block and you’ll see a number. Put you hand to shadow the photoresistor and click again. The numbers should change.
- In my opinion, 90 is a good value. If the sensors value is smaller than 90, I think it’s dark. You’ll have to test your suitable value and you can change it later.

- Now drag the ”Analog reading” inside the ”smaller than” -block, and write for example 90 on the other side. This means: ”if analog reading value is smaller than 90, turn pin 11 off and 13 on. Else...
Here is a picture of components installed. Valosensori means photoresistor.

And, this seems to be working!
1. Install and wire two leds into your breadboard, as you installed on previous task. Use digital pins 11 and 13.
2. Here’s how to install a photoresistor:

Building the program

- Above, I have made settings where digital pin 11 goes ”off” and pin 13 goes ”on” and the others are opposite. Those are inside a Control ”If Else” -block. There is a ”forewer” block waiting. Notice blocks colours. All control blocks are yellow.

- The program has to loop forever, because the photoresistor have to observe the amount of light all the time. So put you program inside ”Forever”

- I want to make it like this: If there is not enough light, turn pin 11 off and punt pin 13 on. Else turn on pin 11 and pin 13 off.
- The photoresistor is an analogic sensor. It gives values of the amount of light in numbers between 0-1023. The bigger number, more light.
- So, I’ll use the green ”smaller than” -block. I dropped it inside ”If”. But I’ll have to find out what numbers to put in. What is the amount of light now?

- Choose Arduino -blocks and pick ”Analog reading”. Now choose from dropdown menu the pin that you connected to Arduino. Now, click the block and you’ll see a number. Put you hand to shadow the photoresistor and click again. The numbers should change.
- In my opinion, 90 is a good value. If the sensors value is smaller than 90, I think it’s dark. You’ll have to test your suitable value and you can change it later.

- Now drag the ”Analog reading” inside the ”smaller than” -block, and write for example 90 on the other side. This means: ”if analog reading value is smaller than 90, turn pin 11 off and 13 on. Else...
Here is a picture of components installed. Valosensori means photoresistor.

And, this seems to be working!