First wiring
TASK: Get a breadboard, one resistor, one LED and two wires.
Electricat wiring is based on closed circuit. Imagine that electicity is a river that flows. It flows always to same direction. It starts from plus (positive), it goes through wire and it has to end up into ground (negative). You can use it’s power anywhere between.
With components you need to know what leg is a plus and wich is ground. In some components it’s marked clearly. If not, you can google it. In some components, it’s irrelecant. For example in LED there is no marking wich is wich. And LED lights only, if you connect it correctly. Take a look at the LED. You notice that the other leg is longer than other. The longer one is posivive. The shorter is negative (ground).

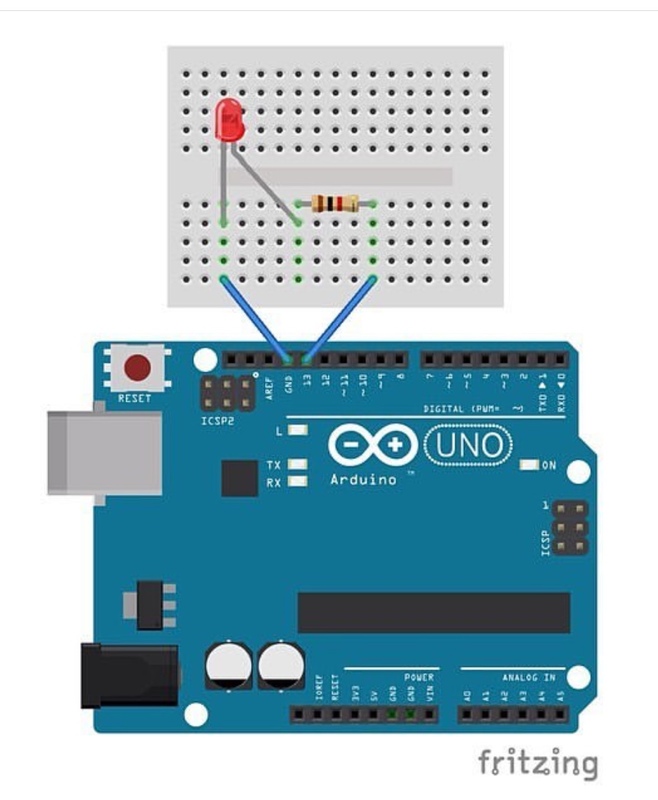
TASK: Do your first wiring as shown in the picture below.

Notice from the picture:
- Plus is wired with red coloured wire, ground with black. Those are the official colour codes. Of course you can wire with any colour you like.
- From the picture you can see markings with green. It shows lines that are connected automaticly at breadboard.
What is wrong? All is done, but there is no light? Don’t worry! First you have to tell Arduino to put the light on 😇
Electricat wiring is based on closed circuit. Imagine that electicity is a river that flows. It flows always to same direction. It starts from plus (positive), it goes through wire and it has to end up into ground (negative). You can use it’s power anywhere between.
With components you need to know what leg is a plus and wich is ground. In some components it’s marked clearly. If not, you can google it. In some components, it’s irrelecant. For example in LED there is no marking wich is wich. And LED lights only, if you connect it correctly. Take a look at the LED. You notice that the other leg is longer than other. The longer one is posivive. The shorter is negative (ground).

TASK: Do your first wiring as shown in the picture below.

Notice from the picture:
- Plus is wired with red coloured wire, ground with black. Those are the official colour codes. Of course you can wire with any colour you like.
- From the picture you can see markings with green. It shows lines that are connected automaticly at breadboard.
What is wrong? All is done, but there is no light? Don’t worry! First you have to tell Arduino to put the light on 😇