1. How are cells researched?
Contents of the chapter

1.1 A case study

Choose an organism for your research, for example a small insect or a part of a plant.
Study the sample by observing it through three levels of magnification:
- With your eyes.
- Through a magnifying glass.
- With a third level of magnification, such as a classroom data projector.
Write down what you notice:
- Make careful observations and record your notes for each step (photo, observations, enlargement).
- Write down what you learned, or something that you already knew but got more accurate information through the observations.
- Write down all the problems, challenges and questions that you faced during the process.
- Compare your findings with your classmates. Write a conclusion together.
1.2 How does a magnifying glass work?

A magnifying glass is a convex lens that magnifies an object when the glass is held up to it.
A double convex lens is much thicker in the middle than in the edges. When light rays pass through a magnifying glass, the convex lens bends the parallel rays so that they converge and create a virtual image on your eyes' retinas. The more curved the convex lens is, the greater its ability to bend light and magnify.
1.3 The study of cells and microbes requires microscopes
 The objects you can observe in nature come in different sizes. Some of them can be seen with the naked eye. However, when we use a school microscope or a magnifying glass, we can smaller objects or even individual cells.
The largest human cell, the ovum (egg cell), can be distinguished with the naked eye.
However, when studying human biology, even smaller things, such as parts of a cell, need to be observed. For this reason, medical research makes use of precision microscopes. Things like pathogens, bacteria and viruses cannot be seen without microscopes.
Genetic factors must be studied by methods other than microscopy. The chart below illustrates sizes of various organisms in a scale from one kilometer to one tenth of a nanometer.
1.4 The structure of a microscope
The light microscopes used in schools usually magnify the image 40–600 times. In comparison, a magnifying glass has a magnifying power of up to x15. Light microscopes combine the magnification of the eyepiece and an object lens. Magnification is calculated by multiplying the eyepiece magnification by the object lens magnification.
Learn the parts of the microscope!
1.5 The working principle of a light microscope
 The light microscope is a device that uses visible light and a series of lenses to produce an enlarged image of an object.
A light microscope contains a minimum of two lenses. The eyepiece is called the ocular, and the lenses above the stage are called object lenses. It is important that the light beams are accurately transmitted and aligned between different lenses and mirrors.
When using the microscope, care must be taken to avoid damage to the device and sample, and to optimize the appearance of the subject. Make sure your desktop is sturdy enough to avoid vibrations and other movements when looking at small objects. Carry the microscope by holding its from its base and its arm.
- Make sure that the shortest lens (lowest magnification) in your microscope points perpendicularly down. If necessary, rotate the lens dial.
- Put your specimen on a slide and place a cover glass above it before placing the microscope slide on the stage. Fasten it with stage clips.
- Switch the light on.
- Look through the eyepiece to see if the specimen appears in the centre of the view. If necessary, move the slide.
- Turn the coarse adjustment knob until the image comes into focus.
- If necessary, use the fine adjustment knob to focus the image further.
- Once the view is in focus, turn the revolving objective turret/nosepiece so that the lowest power objective lens is clicked into position. Use only the fine adjustment for focus.
- To study very small objects you can turn the revolving objective turret/nosepiece again, note that the lens is now very close to the slide or may be attached to it. Therefore, you have to be very careful when focusing the microscope!
1.6 First microscope studies
 The Dutch scientist Antonie van Leeuwenhoek was among the first developers of the microscope. Although he lived over 300 years ago, he could already construct precise and functional microscopes.
During the same time, the English natural philosopher Robert Hooke used a microscope to draw the structure of a head louse (pictured). He was the one to come up with the term cell to describe the small parts he observed in oak bark.
1.7 The electron microscope and the atomic power microscope
Electron microscopes

When looking at the fine structure of a cell, even a good light microscope is no longer capable of producing an image that is accurate enough. In this kind of a situation, an electron microscope is required. Electron microscopes provide higher magnifications and higher resolution images but cannot be used to view living cells.
The two most important applications of electron microscopy are the Transmission Electron Microscope (TEM) and the Scanning Electron Microscope (SEM). There is a big difference in their use. The TEM gives a cross-sectional view of the sample, whereas the SEM reveals the shape of the object's surface. Thus, TEM is closer to the principle of light microscopy. As the name implies, the light source of an electron microscopes are electrons, which are used to bombard the sample. The electron microscope has a much better resolution and depth of field than the light microscope. Electron microscopes, like light microscopes, have a light source and a lens system. The electron beam does not even penetrate the air, let alone the glass lens. Thus, the interior of the electron microscope is vacuum and the lenses are made of magnets instead of glass.
TEM tomography
Electron tomography is a technique used to observe relatively large structures from cellular organs to tissue samples. TEM is also used to scan sports injuries, such as tendon and muscle injuries. The structures to be scanned are 100 to 500 nm (nanometers) in size, and the resolution of the resulting image can display details as small as 4 nm. Although tomography is a great way to create three-dimensional images, it is also a very difficult method. Nowadays, about 100 images are taken during a time of two to four hours, with a full day of image processing. Transmission electron microscopy images are mainly used to determine the cross-sectional structures of cells.
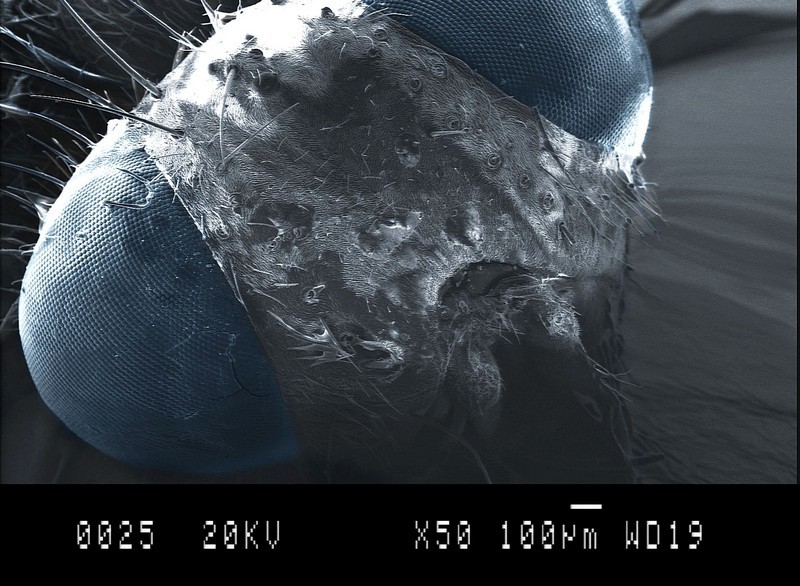
SEM imaging
The scanning electron microscope, or SEM, produces images that display the surface shape of the sample with a resolution of ten nanometers (10 nm = 10-8m). SEM images are accurate over the entire shooting range. For those who are used to viewing 3D images, SEM images are easy to understand. However, complete three-dimensional images cannot be obtained with SEM. This would require combining images from different angles.
Because SEM focuses on the sample’s surface and its composition, the device is used to view the cause of sample-specific surface reactions. Thus, typical applications of SEM include coating inspections, examining the causes of fractures and examining surfaces for microbial contamination or rust damage.
AFM (Atom Force Microscope)
In addition to electron microscopes, the atom force microscope or AFM was developed in the 1980s. It is no longer based on visual observation but on "feeling" or "touching" the surface of the sample with a mechanical probe. AFM is a very versatile microscope used in electronics and chemistry research. It also has a number of biological uses.